Showing posts with label dessert. Show all posts

Tuesday, October 19, 2010

Autumn Perfection: Triple Ginger Cookies

I feel like my brain wants to start every post lately with some comment about how much I love the Fall. I'm sounding less than creative, but it's so true. I LOVE the Fall. And one of the main reasons I love the fall is for all the amazing foods that just taste so much better when the weather is cool. The smell of soup simmering on the stove all day, warm apple cider, sweet squash, root vegetables....sigh. LOVE LOVE LOVE!

One Fall Food that graces my kitchen counters on a verrry regular basis are these incredible Triple Ginger Cookies.
In my husband's world, a cookie is not a cookie without chocolate, so I confess that I bake these quite selfishly for myself. I've never been a big gingersnaps person; they're tasty, but I could never get into that extreme crispiness in a cookie. This, however, is the perfect blend of the gingersnap flavor with a very chewy cookie. They are delicious, and healthy--whole wheat flour, honey-sweetened, loaded with ginger to help you fight off all those nasty cold germs floating around this time of year...I literally can't get enough of them.

The "triple" ginger comes from three different forms of ginger baked into these beauties, so be sure to serve these to kiddos with a big cup of water or milk. Lainey enjoys them, but I do get an earful of "my tongue is tingling, mama!" every time she eats one.

TRIPLE GINGER COOKIES

2 1/2 c whole wheat flour
3 tsp powdered ginger**
1 tsp cinnamon**
1/2 tsp ground cloves**
dash of nutmeg**
2 tsp baking soda
1/2 tsp salt
tiny pinch cayenne pepper (yes, trust me!)
2/3 c honey
1/2 c oil
1 egg
1/2 c molasses
1/2 c chopped crystallized ginger
2 tbsp fresh grated ginger
---display-worthy crystallized ginger---

**I buy my powdered ginger, cinnamon, nutmeg and cloves from Wild Thyme, in Ballston Spa...they sell bulk organic herbs and spices for a FRACTION of what you'd pay in the grocery store, and the quality is incredible.

Heat oven to 350°. Mix all dry ingredients in one bowl, set aside. Mix all wet ingredients in another bowl. Mix wet and dry together.
Gently stir in crystallized ginger and fresh grated ginger.
Drop by the tablespoon onto cookiesheet (I have nonstick, so I don't grease mine) and bake 8-10 minutes. They WILL be soft, DO NOT OVERBAKE! Let sit on cookie sheet for 1-2 minutes, then move to cooling rack to cool completely.

---oops...still working on cracking eggs...---


Monday, October 4, 2010

Rhubarb Cookies

In my house, with the cool weather come lots of warm soups, and lots of baking. I've really gotten in gear this week with both, and today's baking experiment REALLY paid off. I cut and brought in the little bit of rhubarb that I managed to grow in my garden this year--what an amazing plant. The leaves on these stalks were incredible...I'm not a very good photographer, so it isn't the best photo (the apple is for a size reference!), but look at the size of this leaf!! (They actually grow much bigger than this, but my plants were transplanted this Spring and took a while to recover.)
I've realized recently that baking a healthy sweet treat makes a huge difference in my snacking and sweet-cravings all week. When I don't have something baked at home, I still get a sweets craving, and end up getting cookies at the McDonald's drive-thru...mmm, but ick. :) If you're trying to cut back on sweets, try some healthier baked goods at home and see if it helps you, too! (try baking one big batch of something Saturday or Sunday, then you're set for the week...or at least a few days :) )

Back to today's treat: I didn't want to deal with a rhubarb pie, so I hunted for a rhubarb cookie recipe and found this, from thefoodspot.com. I made a few modifications, as always, and these cookies came out waaaay better than I expected. I got nervous once they were in the oven that substituting honey would not give enough sweet to counter my rhubarb's tart, but the sweet level is perfect (unless you ask my husband, who believes a cookie isn't complete without chocolate chips...if you are a fellow chocolate lover, it would definitely work in these cookies).

Rhubarb Cookies

2 cups flour (I used half whole wheat, half all purpose)
1 1/4 cups brown sugar (I used honey)
8 tbsp butter (I used half butter, half chia gel)
1 egg
2 tsp milk
1/2 tsp salt
1/2 tsp nutmeg
1 tsp vanilla
1 tsp baking soda
1 cup dried cranberries (had none, used raisins)
1 cup rhubarb, finely chopped
1 cup chopped walnuts (only had 1/2 cup)

Preheat oven to 350°. Beat wet ingredients in bowl until smooth. Mix in dry ingredients, then stir in rhubarb, raisins, and nuts. Spoon out about 2 tbsp. cookies onto a greased cookie sheet, and bake for 12-14 minutes. Cool one minute on cookie sheet, then move to cooling rack.
Delicious, healthy, and even pretty with those flecks of red rhubarb!

Friday, September 24, 2010

Homemade Applesauce

The Fall is my favorite time of year. Even though it's actually quite the opposite by definition, it always makes me feel alive and full of energy--I think the new school year, starting-fresh feeling of the Fall has stuck with me into adulthood.

Along with cooler weather (a refreshing break from getting sweaty just getting the kids out the door), the Fall season brings many of my favorite foods, and apples are at the top of the list. I am still in awe every year at how incredibly delicious apples are when they are in season and fresh-picked. We've been getting them in the fruit share of our CSA, and have made several batches of applesauce already this year. It's SO easy, and VERY kid-friendly. I think this was the most involved Lainey has been in a cooking activity in a long time.

First off, wash and peel the apples. Really, if you're making a good-sized batch of applesauce, you've gotta have one of these:
It peels, cores, and slices up your apples in seconds. And, supervised, it's kiddo-friendly and really fun!
Get rid of all those peels and cores, and throw your apple slices in a large saucepan. Cover the bottom with just a drizzle of water...I usually use enough to cover the bottom of my pan about a half inch or so...again, I don't measure it, so just eyeball and add more if you need to! (another very kid-friendly step: no measuring required, no hot stove!)
Now just put it on the stove, covered, and medium-low heat, and let it simmer away. In about 30-45 minutes, shake in your cinnamon and nutmeg (amounts are up to you--to your taste), give it a little mash up with a fork or a pastry cutter, and you'll have this:
You do NOT need to add sugar to this applesauce! If you are using fresh apples in season, they are delicious enough. No sugar needed. :)

Happy Fall!

Monday, August 23, 2010

Easy Popsicles

Last week, I wrote a product review of these popsicle molds (thanks, Jeanine!!) by Tovolo:
(see it on the other blog I write for, From Scratch)

I am definitely a big fan. The molds themselves are great, and the process of popsicle making is so toddler friendly: it's very easy, there's no hot stove involved, and the end result is a super kid-friendly treat.
We have made three batches now from our one bottle of juice. The first round was half creamsicles and half popsicles, but the straight up juice is a much bigger hit, so we've been sticking with those. There's no recipe, just pour the juice into the molds and freeze. Lainey has helped by using her kid sized ladle to fill them, but here's a few more complicated (if you could even call it that!) recipes that I think we'll try in the coming weeks.
The very best thing about these popsicles is a completely unexpected surprise...these are pretty good-sized popsicles, so it takes a good 30 minutes for Lainey to eat an entire popsicle (which she always does...she's devouring these things the the very last lick!). This means a full half hour of time for me...to get a meal ready/clean up (or maybe blog... :) ).


Sunday, August 15, 2010

Goodbye, Terrible Twos!


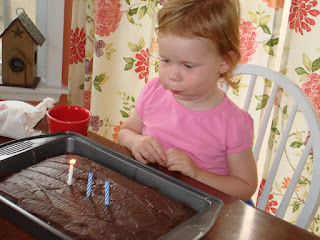
My sweet Lainey turned three last week. It's almost impossible to believe. I can barely wrap my brain around the memories of my life without her in it, yet at the same time it feels like these three years have passed in the blink of an eye.

This year we kept her birthday celebration simple: family, pizza, and cake. For the sake of the cake, I try to let go of my healthy cooking ideals, really I do...but it's really hard for me! I feel like I can totally let go for store-bought treats; a Klondike Bar is a Klondike Bar...there's not much I can do but just eat it and enjoy every bite. :) But when something is homemade (by me), I find I just can't bake something sinfully (as in, not one single healthy ingredient) delicious. I pore over recipes, looking for the dessert that will taste sinful, but actually be not-so-bad. For her 1st and 2nd birthdays, I made a Chocoalte Beet Cake (from Deceptively Delicious); it was tasty, but not a knock-your-onesie-off chocolate cake. This year, I totally achieved what I'll call Sinfully Nutritious. Woohoo!


another fantastic find on allrecipes.com

2 c all-purpose flour (I used half whole wheat)
2 c sugar
3/4 c cocoa power
2 tsp baking soda
1 tsp baking powder
1/2 tsp salt
1 tsp cinnamon
3 + c grated zucchini
1 1/2 c vegetable oil
4 eggs

1. Preheat oven to 350. Grease and flour a 9x13 baking pan.
2. In a medium bowl, stir together the flour, sugar cocoa, baking soda, baking powder, salt and cinnamon. Add the eggs adn oil, mix well. Fold in zucchini until evenly distributed. Pour into prepared pan.
3. Bake 50-60 minutes, until a knife inserted in the center comes out clean. Cool completely before frosting.

I topped with this frosting, it was fast, easy, and soooo good. Happy Birthday, my sweet girl!

Thursday, June 24, 2010

Garden Cake

Tomorrow morning we head out for our first camping trip as a family of four. I'm so excited; a long weekend away with my amazing, sweet little family AND our great friends, Charles and Sara. Lainey and I spent this morning cooking and baking a slew of yummy snacks to take along. We had a pasta salad, a batch of my pesto-ish spread (this time with broccoli rabe, garlic scapes, and basil), and a batch of mini cupcakes all done before 11 a.m.

These garden cake mini-muffins came from one of my new favorite cookbooks--"More Vegetables, Please!" by Elson M. Haas, MD and Patty James, MS. It's kind of like the non-deceptive version of Deceptively Delicious....full of ideas to incorporate veggies in your meals, but by preparing them in better more appealing ways, instead of trying to trick your family into eating them.

Lainey so enjoyed making these muffins with me; this was the most enjoyable thing we've ever made together because of how involved and into it she was. She helped me grate all the vegetables with my cool old hand-cranked grater (called a King Kutter, find one on ebay!)
and loved tasting them in the grated form (and found she loves grated carrots!). She mixed, poured, grated, drank applesauce, and discovered a love of a new veggie...what more could I ask for? :)


My mom always told me to eat a rainbow of colors...I'm so in love with dessert that has all these beautiful colors baked right in!


GARDEN CAKE
from More Vegetables, Please!

1/2 c walnut oil (I used canola)
1/2 c applesauce
3 eggs
1 1/4 c sugar (I used just 1)
2 tsp vanilla
2 c whole wheat flour
2 tsp baking powder
1/4 tsp sea salt
1 1/2 tsp cinnamon
1 c unpeeled and grated carrots
1 c unpeeled and grated zucchini
1/2 c unpeeled and grated beets
1 c chocolate chips (optional)
1/2 c chopped walnuts (optional)

Preheat oven to 350°. Grease and flour a 9x13 pan. (I made mine in mini-muffin tin...just adjust bake time depending on what you bake it in).

In a large bowl, mix the oil, applesauce, eggs, and sugar, beating well with a hand mixer or whisk for 3-4 minutes.

In a small bowl, combine flour, baking powder, salt and cinnamon. Stir into wet ingredients. Add shredded veggies, chocolate chips, and walnuts. Stir until blended and pour into prepared pan. Bake 35-40 minutes (mini muffins took about 12 minutes), until toothpick comes out clean.

Tuesday, May 11, 2010

Chia Tollhouse Cookies

Remember my chia seeds post? As promised, I experimented with the incredible ch-ch-ch-chia seeds. My research said that I could use chia gel to replace HALF the butter in my baked goods, so I went all out and made a modified batch of Toll House Chocolate Chip cookies.

First step was to make some chia gel...mix 1 tbsp. of chia seeds (they look almost like poppy seeds) with 8 tbsp. of water. Let it sit for just a minute, and you have GEL. I took a photo but it really didn't look like the real-life stuff in my bowl. In real-life, it looked like caviar. Every tiny seed surrounded with a transparent jelly coating. Definitely not something that I felt I wanted to eat. But I pressed on.

Next step, I followed the Toll House recipe, exactly, except for the butter. This is a good cut-down-the-butter recipe, as the original recipe calls for TWO STICKS of butter. Yup.
Hello clogged arteries. One stick of butter equals 8 tablespoons, so into my mixing bowl went ONE stick of butter and 8 tbsp. of my slimy chia gel. Once it was all mixed up, my batter looked pretty normal...the seeds were visibly scattered throughout, and it seemed a little moister than usual, but it looked like cookie dough.

They came out of the oven and looked pretty darn good:


I was still a little wary, though. It was hard to imagine how the slippery, slimy chia gel could cook up into a delicious cookie...

My final verdict after the taste test...WOAH! These cookies were so good. They didn't taste like an original Toll House cookie. They just tasted like a really good chocolate chip cookie. They were lacking the usual crispy edges that the butter provides, but they were incredibly moist and chewy. Turns out that slimy texture turns into chewy perfection once it's baked (couldn't even taste any seeds)!

They cut the fat in HALF, and added healthy omega 3's...these seeds will be stocked in my cupboard from now on. Try 'em!! :)

Friday, April 23, 2010

Ch-Ch-Ch-Chia!

Doesn't just reading that instantly bring you back 20 years? (sad, huh? It has indeed been that long.) If you watched any TV, you remember this beauty from 1985:


I remember we got my Mom one for Mother's Day one year. It was great, and weird. The seeds mixed into a slimy, jelly, spreadable blob. One would think there must have been some strange additive into the seed mix to make it that way, right? Nope. They just do that.

I'm sure you're wondering why I'm discussing Chia Pets on a food blog. Turns out those little chia seeds are a SUPER food. They're high in Omega-3 fatty acids (even more than flax seeds), calcium, and protein, and pack tons of fiber. Chia seeds even made it onto Oprah with Dr. Oz-- here.


I bought some at the co-op this week and I'm trying a few different things with them. We had some sprinkled on our salad, and I didn't even notice them (they're flavorless, by the way). I'm planning to make some chia gel to bake with (see this website; you can replace half the butter in a recipe w/ gel and supposedly not notice...I'll keep you posted on that one). And for dessert tonight I made chocolate rice krispie treats with some mixed in, and they were DELISH. Even my non-health-food-nut parents enjoyed them. Recipe follows below, and I will experiment with some cookie-baking this week.

PS-Good luck getting the Chia Pet song out of your head. :)


Chocolate Chia Rice Krisipie Treats
modified from Clean Food, by Terry Walters

3/4 c. maple syrup
1/2 c. peanut butter
1/4 c. chocolate chips
3 c. crispy rice cereal
1/4 c. toasted sesame seeds
1/4 c. chia seeds

In a medium Dutch oven over medium-low heat, combine syrup and peanut butter until smooth. Add chocolate chips and stir until melted. Fold in rice cereal, chia seeds, and sesame seeds and stir to coat everything. Press into an 8x8 casserole and refrigerate until firm (at least 20 minutes). Cut into squares and serve or store in an airtight container.
Makes 1-1 1/2 dozen 1" squares

Thursday, April 15, 2010

Mr. Magoo Muffins


Thanks to one of my favorite blogs, Mixing Bowl Kids, for this recipe! These Cereal Muffin Treats, or Mr. Magoo Muffins as Lainey calls them, are sooo good! Really, though, how could you go wrong with your favorite cereals and chocolate? Also check out Jan's other blog, Family Bites, for more great food ideas!

Lainey really had fun helping me make these. She mixed, she poured, but perhaps most importantly, she licked. Thank goodness I had the forethought to take off her shirt! :)


You know you've really enjoyed yourself when there's chocolate in your hair...


Monday, March 8, 2010

California, Here I Come!

I'm taking a mini-vacation this week...Lainey is staying home with Daddy, while baby Sarah and I fly with my dear friend to San Francisco for a long weekend. I'm super excited. However, it hit me last night that I'll be leaving half of my little family with no head chef. :) Unfortunately (for them), my hubby is a mess in the kitchen (figuratively and literally!)...so I'm left with two choices:
1. Leave them to fend for themselves (and eat Moe's bean burritos, PBJs, and canned baked beans) for five days.
OR
2. Get crackin' on some serious cooking that will feed them at least
something in the healthy/vegetable category while I'm away.


So, I got my butt in gear today. I made the biggest batch ever of my veggie soup this morning, and I'm making a super-sized
dinner for tomorrow night with the hopes of having some leftovers to save (menu TBD...still unsure). Then Lainey and I baked some delicious Chocolate Chip Banana Muffins this afternoon. She is my official banana masher.

This is one of our favorite recipes, we make some with our extra bananas just about every week. It's really,
really good, and does NOT taste like it's whole wheat. (Check out Lainey's beautiful apron from our friend Emma!! :) )

CHOCOLATE CHIP BANANA BREAD MUFFINS
,
adapted from Whole Foods for the Whole Family
1 3/4 c whole wheat flour

1 t. baking soda
1/2 t. salt

1/3 c. oil

1/2 c. honey
2 eggs, beaten OR 1/2 c applesauce (I do applesauce, they come out super moist)
3 medium bananas, mashed
1/4 c.
hot water
1 c. choc chips (I use the grain sweetened chips from the co-op, just eyeball it until it looks good and chippy!)
Cream oil and honey in mixer. Mix in the applesauce, then bananas. Add the dry ingredients, pour in the hot water (I just keep the mixer on the whole time), then fold in the chips. Bake at 325° until a toothpick comes out clean. Time depends on what you make--mini muffins take about 10 minutes. A loaf pan takes 45-55 minutes.


The end of my kitchen help came when a pretend phone call came in from Aunt Erin... :)


The last while-I'm-away menu item I made was a surprisingly tasty salad dressing for some Apple Goat Cheese Salad. I've kind of been on a goat cheese kick ever since my pizza... Anyway, the dressing is five minutes to mix up, then just drizzle over some lettuce (pre-washed
and waiting for family in the fridge!) with diced apples and some goat cheese crumbles. We had some tonight and it was a hit with the adults. Lainey didn't like the goat cheese, so I'll leave that out for her next time. Who knew there was a cheese she wouldn't like?


SALAD DRESSING, from Paula Deen

2 tbsp red wine vinegar
1/2 tsp dijon mustard
1 small clove garlic, minced
1/2 tsp salt
1/2 tsp pepper
1/3 c olive oil

Mix all ingredients but oil. Whisk in oil or just shake it up in a jar with a lid!

I may post my last big-batch dinner, but in all likelihood I'll be hustling around trying to get my packing done tomorrow. Anyone have any tips on what NOT to miss while in San Francisco??